Sunday 13 December 2015

Mince Pies


The classic mince pie. Can't be beaten. Serve warm; prize off the lid, top with a dollop of clotted cream, replace the lid and prepare for deliciousness.

For 12 - 15 mince pies

8 oz plain flour
pinch salt
2 oz white vegetable fat (eg Trex), cut into 2 cm cubes
2 oz butter cut into 2 cm cubes
2 - 3 tbsp very cold water
a jar of mincemeat
a splash of milk
sprinkling of sugar


  • To make the pastry, put the flour,salt, butter and vegetable fat into a stand mixer bowl. Mix with the 'k' beater until the mixture resembles breadcrumbs - it doesn't mater if there are still a few small lumps of butter. This can also be done in a food processor (beware of overmixing, it mixes very quickly).
  • Add two tablespoons of the cold water and mix slowly until the mixture begins to clump together and a dough begins to form. If it still looks dry, add another half a spoon of water and mix some more; don't be tempted to put too much water in at a time. At this stage it is important not to work the dough too much, or it will become tough (this is all to do with the amount of gluten that forms in the dough if you overwork it, or if you add too much water- you don't want pastry dough to be made too elastic by the gluten, so you work it as little as possible). As soon as you have clumps of mixture stop mixing and try gently squishing the clumps together with your fingers. If a dough forms without flakes coming off, it's ready and you can tip it onto a work surface and gently squish it all together to form a ball of dough. 
  • If you're not in too much of a rush, wrap the dough in cling film and put it in the fridge for 15 minutes. Apparently this makes it easier to roll out. I often am in too much of a rush, so I roll it straight away. Putting it in the fridge to rest is supposed to allow the gluten time to relax, but I'm blowed if the gluten is going to get to relax if I don't!
  • Flour the surface lightly, flour the rolling pin and roll the dough to thickness of about 4mm. Using pastry cutters, cut out 12 circles big enough for your bases and 12 smaller circles for the lids  (a regular mince pie tin needs bases about 7cm diameter and lids about 5.5cm). You will need to squish the dough trimmings back together and re-roll to get the full number. I have read that you shouldn't re-roll the trimmings more than a couple of times, to avoid tough pastry, but I just keep going until I've used up all the pastry, normally ending up with 15 pies for this amount of pastry.
  • Preheat the oven to 180 C
  • Lay the bases in the mince pie tin, put in about 1 tsp of mincemeat (I always use the mincemeat as it comes from the jar, although you can make your own, or add extras like chopped apple and brandy to the jar).
  • Top with the lids, very gently pressing them onto the bases. (Because we serve the hot pies with clotted cream, we like to prize off the lids and put the cream inside, so you don't want the lids too stuck down. You can always just dollop the cream on top of the cooked pie if you prefer.)
  • With the tip of a sharp knife make a couple of little slits in the top of each pie, then brush them with a little milk and sprinkle with granulated sugar.
  • Bake in the hot oven for about 15 minutes, then transfer to a cooling rack. If you want you can give them a dusting of icing sugar before serving.
  • Serve with proper Cornish or Devon clotted cream, although I believe some people like them with brandy butter or single cream.


Please don't eat me!


Thursday 10 December 2015

Lamb Tagine


Last year for Christmas we got a tagine dish. Initially sceptical, I couldn't imagine that a tagine cooked in this would be any different from a tagine cooked in any other kind of casserole dish. Well my scepticism was unfounded - the tagine that emerged from this dish was juicy and delicious, the lamb meltingly tender and the sauce thick and unctuous. The only problem is that you can only cook enough for four and it would be nice to have a bigger pot for entertaining. The tagine cooks long and slow and needs virtually no attention during its time in the oven. Serve it with couscous and some steamed veg for a hearty warming dinner.

This was the first time that I have used the North African spice mix, ras el hanout. Before I have resorted to a mixture of paprika, cumin and coriander. The ras el hanout made a big difference. It's difficult to say what the main flavours are, but there is pepper, cinnamon and a chili kick, but  also a surprising scent of rose as I fried the meat. This wasn't obvious in the finished dish, but I guess it must have added an extra dimension. I was lucky enough to get some brought back from Tunisia, but it is available in some supermarkets or online. Definitely worth tracking down.

For four people:
about 800g diced lamb shoulder, most (but not all) of the fat removed (I bought a shoulder roast with the bone in, weighing about 1.1kg)
1 large leek, cleaned and sliced
1 red pepper, chopped
2 cloves garlic
ras el hanout spice mix brought back from Tunisia.
1 tbsp ras el hanout spice mix
1 tsp flour
1 tsp smoked paprika
1 tsp harissa paste
a few sundried tomatoes in oil, chopped
a cooked red pepper (antipasti type from a jar) chopped
1 can tomatoes
about 10 dried apricots, roughly chopped
about 6 dates, roughly chopped
sea salt to taste
fresh coriander, chopped
good handful of flaked blanched almonds

  1. Pre heat the oven to 150 C
  2. Toss the cubes of meat in the ras el hanout, smoked paprika and flour, then fry them in batches in sunflower oil to brown them all over.
  3. Transfer the meat to the tagine dish, deglaze the pan with a bit of the juice from the can of tomatoes and put that with the meat. 
  4. Using the same pan, gently fry the leeks and fresh red pepper in some of the oil from the jar of sundried tomatoes. It should only be slightly softened and slightly browned, not cooked through. Throw in the garlic, the sundried tomatoes, cooked pepper, harrissa, apricots, dates and the tin of tomatoes. Swish out the can of tomatoes with about half a can of water and add that to the mixture and bring almost to the boil. Season with some sea salt.
  5. Add the lamb cubes and stir it all together, then transfer it all to the tagine dish, put the lid on and put it into the preheated oven for 2 hours. It can stay in there longer, just lower the heat down to about 100 C. Don't lift the lid during cooking - it will all stay nice and moist if you just leave it alone.
  6. Before serving, scatter the top with the flaked almonds and some chopped fresh coriander.
  7. Serve with couscous (allow around 75g dry couscous per person)


Saturday 5 December 2015

Fish baked in parchment with Beurre Blanc Sauce

Baking fish in parchment is a quick and easy way to cook it and has the advantage of keeping it deliciously moist and tender. It also makes for a very quick cleanup with no messy oven pans to wash. 
I have tried it with various firm-fleshed white fish and salmon. Here I used a selection of monkfish, swordfish and ray wings that happened to be on quick sale at the supermarket. Never having tried ray wings before I thought they looked interesting. They were tasty and creamy in texture, but I'm not sure I'd buy them again; they had a strong, almost bitter flavour. The monkfish and swordfish were delicious. 
I had some parchment bags in a drawer that have been lying around forever, so I used those to wrap the fish. You can use sheets of parchment folded artfully around the fish, or even tin foil. I fear that my parchment folding would not be brilliant and it would leak. 
I once went to a Japanese cooking demonstration where the Mr Okada, the chef, used a kind of turkey roasting bag, cut into squares and tied around the fish (in that case black cod, with added onions, mushrooms, a kind of mayonnaisey sauce seasoned with dashi and a small piece of chicken thigh, which was totally amazing and which I still crave today - that's a recipe for another day). You could get away without making an extra sauce as the juices from the fish and veggies mix with the white wine in the bag to form a tasty sauce. However, we tend to like quite a lot of sauce on our food, and the beurre blanc adds a luxurious touch and does go really nicely with the boiled new potatoes.
  • About 175g fish per person
  • about 3 tbsp chopped fresh herbs - (eg parsley, thyme, rosemary, chives)
  • clove garlic, crushed
  • 2 sundried tomatoes in oil, chopped
  • handful of dried mushrooms, soaked in water to reconstitute, then drained and chopped
  • 2 tbsp olive oil (substitute some with the oil from the tomatoes)
  • 1 large leek, cleaned and julienned
  • about 1/2 cup white wine
  • salt and pepper

  1. Preheat the oven to 200 C.
  2. Cut the fish into large chunks, removing bones. (I used the monkfish bones to make a little bit of stock to add to the sauce - put in half a cup or so of water, a sprig of thyme and rosemary and a bayleaf and a few of the chopped leeks, boil it up for a few minutes, strain and reduce).
  3. Mix together the herbs,garlic, oil, tomatoes and mushrooms and put in a large bowl. Add the fish and gently stir around to coat it. Season then pour in the white wine and set aside for a few minutes while you prepare some veggies (I just used new potatoes and green beans).
  4. Put the fish into a parchment bag (or arrange on squares of parchment large enough to fold up around it. Put the chopped leeks on the top of the fish. Pour over the wine, fold over the parchment to seal. I split it between three bags, but you can put it all in one big bag, or make individual parcels for each diner to open at the table if you prefer.
  5. Bake in the preheated oven for 15 - 20 minutes (depending on the thickness of the fish). You can just open the end of the parcel to check if it's done, refolding and giving it an extra few minutes if need be.

For the beurre blanc sauce:
1 shallot, finely chopped
60 ml white wine
60 ml fish stock or water
30 ml white wine vinegar
30 ml lemon juice
100g cubed butter (should really be unsalted, but I only had salted and it was fine)
  1. Put all the ingredients apart from the butter into a small heavy based saucepan and boil to reduce to a syrupy liquid. Gradually whisk in cubes of the butter to form an emulsion.


Friday 27 November 2015

Slow cooker Irish Stew and Dumplings

A hearty, warming winter favourite. It's one of the recipes that you can put on in the morning and leave all day to simmer away into lamby, oniony perfection. We like it with dumplings, and I tried to cook them in the slow cooker, but they didn't cook very well. I ended up finishing it off in the oven to get dumplings cooked through and with just a hint of brown on the top. It's really quick to prepare if you have a food processor with a slicing disc as it powers its way through the veg slicing in no time and the veg is sliced consistently thinly, something I'm hopeless at doing by hand.
The stew before cooking. I forgot to photograph it in all its glory at the end of cooking. Next time...
  • 700g potatoes, thinly sliced
  • 400g carrots, thinly sliced
  • 2 onions (about 300g) thinly sliced
  • 600g stewing lamb
  • about 1 litre stock (I used homemade unsalted chicken stock and crumbled a Knorr lamb stock cube into the stew for extra flavour)
  • salt (but be careful if using stock cubes as they usually have a lot of salt)
  • pepper
For the dumplings:
  • 8oz self raising flour
  • 1/2 tsp salt
  • 1/2 tsp mixed herbs
  • 4oz suet
  • 1 - 2 tbsp water to mix


  1. Cut up the meat into bite sized chunks, removing excess fat.
  2. Put the sliced potatoes in the base of the slow cooker.
  3. Cover with a layer of sliced carrots, then onions.
  4. Arrange the lamb on top.
  5. Season with pepper
  6. pour over enough hot stock to more or less cover the meat.
  7. Cook for about 9 hours or so. I usually set it on Auto, which cooks it on high for a while, then switches it to low for the remainder of the time.
  8. To make the dumplings, pre heat the oven to 190 C. Stir the suet into the flour, stir in the salt and herbs, then add enough water to form a dough. Shape into balls slightly smaller than a golf ball (they will expand) and put on top of the stew about half and hour before you want to serve it. Cover and cook in the oven for about 15mins, then remove the lid and let them brown for another 10 - 15 minutes.

Gammon

When we have gammon I always cook it in the pressure cooker using the method described in my trusty old pressure cooker manual. This is getting increasingly illegible thanks to the splashes of gammon stock, so here's a photo of it. I cooked this a couple of days ago, and planned to take a photo, but it proved such a hit that we had eaten it before I remembered.

Basically you need to soak a smoked gammon joint in cold water for a couple of hours, then drain it put it into the pressure cooker, cover with water and bring to the boil. You then drain it again (the idea being to get rid of excess salt, although it still ends up pretty salty). Then put it back in the pressure cooker, almost cover it with cold water, add a bayleaf, some leek or onion, a carrot, and any other herbs you happen to have (thyme and sage are good). Bring it up to pressure and cook it under pressure for 12 minutes per 400g. You take it off the heat at the end of cooking and let the pressure come down on its own.

I usually serve it with roast potatoes and whatever veg I have on hand. Roasted cauliflower is good (sprinkle with cumin seeds, salt and pepper and toss with olive oil before roasting for about 25 mins). This time I made a creamy leek and cava sauce to serve with it as I had a solitary leek lurking in the fridge and the dregs of a bottle of cava on the side. I gently sauteed the leek in butter for a few minutes until it was soft, threw in a couple of teaspoons of cornflour and cooked that out. Then I poured in the cava (about 1 small glass), stirring to over a gentle heat to cook off the alcohol, then stirred in some milk and some of the stock from the gammon, stirring all the time as the sauce thickened, then I finished it with a little single cream and some seasoning. Any white sauce made with a roux base (about 25g each butter and cornflour cooked together) and a mixture of the stock and milk to thicken works well - chopped parsley  is a good addition.

Whatever you do, don't throw away the stock after cooking the gammon - it is the perfect base for my favourite spilt pea and bacon soup. As it is very salty however, you do need to dilute one to one with water if you use it for this recipe.

Wednesday 25 November 2015

Fruit Salad

Easy peasy dessert, delicious, fresh and very healthy. You can use whatever combination of fruits that you like; I try to make it as colourful as possible. But one fruit you will never ever find in my fruit salad is banana because I hate the slimy texture it takes on. Here I used apple, pear, red and white grapes, strawberries, pineapple, cantaloupe and galia melon, blueberries and orange segments. The syrup is very light, and not too sweet, and the lemon juice in the syrup stops the fruit from going brown. It keeps for a couple of days in the fridge and is great for breakfast with muesli.
For the syrup:
1 lemon
1/2 pint /300ml water
2oz granulated sugar 

  1. Put the water into a microwave proof jug with the sugar and heat in the microwave, stirring occasionally, until the sugar dissolves. Add the juice of the lemon, stir well and leave to cool.
  2. Pour the syrup into a large bowl
  3. Cut up fruit of your choice into bite sized chunks and stir into the syrup. It doesn't all need to be submerged, just make sure that it has all been coated with the syrup to stop it from browning.
  4. That's it; I said it was easy!

You can serve it with single cream, but I prefer it without.

Sunday 15 November 2015

Spiced Apple Cake


For the cake:

300g/10oz SR flour
1/2 teaspoon salt
2 tsp ground mixed spice
113g/4oz butter, softened (or sunflower spread/marg)
113g/4oz brown sugar
1/2 tsp vanilla extract
2 large eggs
about 360-375g/ 12-13oz unsweetened stewed apple
50 g/2oz walnuts, roughly chopped

For the icing:
50g/ 2oz/ 1/2 cup icing sugar
1 – 2 tbsp maple syrup
1 - 2 tsp water
1/2 tsp cinnamon (optional)

Preheat oven to 180 C/gas mark 4. Grease a large loaf tin.
1.  Whisk together flour, salt, and mixed spice.
2.  Cream butter/marg, brown sugar, and vanilla until pale and fluffy.
3.  Add eggs one at a time, beating well after each addition, then mix in stewed apple.
4.  Gently fold in flour mixture until just combined, then stir in walnuts.
5.   Spread evenly in loaf tin and bake until golden brown and a skewer inserted into centre of the cake comes out clean, about 40 minutes. Cool in the tin for 15 minutes. Loosen by running a knife around edge of tin, then turn out onto a rack to cool completely.
6.   For the icing, put the icing sugar, cinnamon and maple syrup in a large bowl and stir to combine, adding water if necessary to make a smooth consistency
Drizzle the icing over the cooled cake.

Fish and bacon chowder - original recipe

This is a flavoursome and hearty (and economical) main meal soup, even though it looks a bit uninspiring. Stir in some single cream and sprinkle with freshly ground black pepper, grated nutmeg and maybe some snipped up fresh chives or chopped parsley just before serving. Serve with fresh bread - herb and garlic or olive bread goes well with it. I always make it in the pressure cooker, so it cooks very quickly. 
serves 4 - 5
  • 1 large onion, chopped
  • 350g bacon, chopped
  • olive oil
  • 1 tsp dried mixed herbs
  • 450g - 500g white fish fillets (the cheap frozen kind work fine in this recipe)
  • 500 - 600 g potatoes, peeled and chopped into bitesized chunks
  • 1 bayleaf
  • 1.5 l chicken or fish stock, preferably home made without added salt
  • salt and pepper
  • dash or two of milk (optional)
  • 1 - 2 tbsp single cream
  • freshly grated nutmeg
  • 1 tbsp chopped chives or parsley

  1. Heat the bacon gently in a large pressure cooker or large deep cooking pot until the fat starts to run out. If the bacon is very lean add some olive oil.
  2. Toss in the onion and mixed herbs and fry gently to soften.
  3. Toss in the potato and saute gently for a couple of minutes.
  4. Pour in the stock, add the bayleaf and season well with black pepper. Hold back with the salt as the bacon usually adds enough.
  5. If using a pressure cooker, lay the whole frozen fish fillets on top, no need to defrost first. Close the cooker and bring up to pressure. It will take a while to come up to pressure, during which time the fish will thaw and start to cook. Once at pressure, cook for about 3 minutes, then let the pressure down and check if the potatoes are done. This may seem quite short, but you don't want to over cook the fish. If you are using a regular cooking pot it will need longer - cook the chowder without the fish for about 5 minutes to get the potatoes started, then add the fish and continue cooking for another 10 minutes or so; keep checking to see if it's done.
  6. Give it a good stir and squish some of the potatoes to thicken it up a bit. You can add a dash of milk at this stage if it look a bit watery (although it will taste just fine without).
  7. Check the seasoning, adding more salt if necessary.
  8. Pour into bowls, stir a dash of single cream into each bowl and grate some nutmeg over the top, along with a grind of fresh black pepper. Sprinkle over some fresh herbs if you have them and serve with plenty of bread and butter.


Monday 9 November 2015

Carrot cake

This is such a delicious cake and actually not too unhealthy (if you discount the icing). I originally picked up the recipe in South Africa about 20 years ago and I've gradually adapted it to our tastes. I'm guessing a lot of people might find it's not sweet enough, but for me it's perfect. I've cut the amount of sugar in the cake itself by at least a half from the original recipe (and the carrots do contain plenty of sugar too of course). The last time I baked it I only used 4 ounces of sugar, but 6 ounces is a good compromise. The icing has a lot of sugar and balances the sweetness in the whole cake. You could make the mixture up in muffin cases and skip the icing for a pretty healthy snack.

For the cake:
  • 8 oz/225g self raising flour
  • 1 tsp ground cinnamon
  • 2 tsp ground mixed spice
  • 1/2 tsp salt
  • 4oz/113g sunflower spread or softened butter
  • 4 - 6oz (113g - 170g) brown sugar, depending on how sweet you like your cake
  • 50ml sunflower oil
  • 2 tbsp water
  • 4 eggs, beaten
  • 1/2 tsp vanilla essence
  • 4oz/113g chopped walnuts
  • 10oz / 285 g raw carrots

For the icing:

  • 1.5 oz /42g softened butter, preferably unsalted
  • 6 oz /170g icing sugar
  • 2 tbsp lemon juice (or to taste)
  1. Preheat the oven to 180C/350F/gas mark 4 and grease a large loaf tin, or 9 inch square deep pan.
  2. Peel and grate the carrots (easy in a food processor with the grating attachment).
  3. Whisk together the flour, spices and salt.
  4. Beat margarine/butter, oil, sugar and water until light and creamy.
  5. Add the eggs one at a time, and the vanilla, beating well each time.
  6. Fold in the flour mixture until just combined
  7. Gently stir in the carrots and walnuts.
  8. Spoon the mixture into the prepared tin and bake for about 45 minutes, until a skewer inserted into the centre comes out clean.
  9. Turn out onto a cooling rack and allow to cool completely before icing.
  10. Beat the icing ingredients together in a bowl until smooth.
  11. Spread the icing over the cooled cake. Or in our case, cut the end slice off the hot cake and spread a little icing on it because you just can't wait for it to cool. Then ice the rest of the cake when it really is cool.


Thursday 5 November 2015

Chicken, bacon and mushroom lasagne

This dish is based on a recipe from the side of a pack of Presto lasagne from many years ago. I even still have the original recipe, although Presto has long since gone out of business. Over the years I've adapted the recipe and it makes a regular appearance on our table throughout the year.
For the tomato layer:
1 leek, cleaned and sliced
1 tsp dried mixed herbs
275g mushrooms, cleaned and sliced
400g tin tomatoes
dash red wine
1 bay leaf
seasoning

For the chicken and bacon layer:
250g cooked chicken, chopped
175g cooked bacon, chopped
30g marg
30g cornflour
1 pint (450ml) chicken stock
300ml milk
320g lasagne sheets
For the topping:
75-100g grated cheese 
  1. Gently fry the leek and mushroom with the dried herbs in a glug of olive oil until softened, about 5 - 10 minutes.
  2. Add the tomatoes, red wine and bay leaf, season and simmer for 10 minutes.
  3. In a separate pan, melt the margarine/butter, stir in the cornflour and cook gently for 2 or 3 minutes.
  4. Stir in the stock and milk gradually, stirring constantly until a smooth sauce forms. (If I get lumps, I have been known to blast the sauce with a hand blender, but it's usually ok).
  5. Take out about 1 pint of the sauce to use for the topping and set aside.
  6. Stir in the cooked chicken and bacon into the remaining sauce, taste and season with salt and pepper if needed.
  7. Stir half the grated cheese into the sauce you set aside for the topping.
  8. Assemble the lasagne in a large baking dish, starting with a tomato layer, then lasagne, then chicken. Repeat these layers, then top the last layer of lasagne with the cheese sauce and sprinkle over the rest of the grated cheese. You will see in the picture that one corner is cheeseless, as we have a cheese hater in the family (he will tolerate the cheese in the sauce, but not the extra on top).
  9. Bake at 190C for about 45 minutes, until the lasagne is cooked and the topping is golden brown.


Guacamole


Just yum.

1/4 of a small peeled onion or 2 - 3 cleaned and trimmed spring onions
1 large tomato quartered
2 medium avocados
squeeze of lemon or lime juice
salt and pepper
optional handful of washed fresh coriander
optional dash tabasco sauce

Put the onion and tomato (and coriander if using) in a food processor and pulse until roughly chopped.
Scoop out the flesh from the avocados and add to the food processor with the lemon/lime juice and seasoning and tabasco if using. Pulse until combined, but not too smooth. 
If you don't have a processor, you can chop everything by hand, but it will be a much chunkier guacamole.
Taste and adjust seasoning as necessary.
Serve with tortilla chips.

Tip: If you have left over tortillas after a Mexican meal, you can cut them up into triangles and bake in a low oven (about 100C) for about half an hour or so to dry them out. They are great for dipping in guacamole.

Wednesday 21 October 2015

Split pea and bacon soup

You can't beat this soup. Warming, bacony, thick and delicious, served with some fresh bread it makes a perfect lunch. I always cook it in a pressure cooker and it's very quick and easy. It would need to cook much longer in a normal saucepan and I'm not sure how it would turn out. 

  • 1 large onion
  • 250g cooking bacon, chopped (preferably smoked)
  • 200g dried yellow split peas
  • 1 litre ham, chicken or vegetable stock (be careful if using a stock cube, as it can become too salty if the bacon is also particularly salty)
  • 1 bay leaf


  1. In a large pressure cooker start to heat the bacon gently until the fat begins to run out. If the bacon is very lean, add a little olive oil.
  2. Add the chopped onion and fry gently for 3 or 4 minutes until slightly softened.
  3. Add the split peas, stock and bay leaf and give it all a good stir.
  4. Close the pressure cooker and cook the soup under pressure for 15 minutes. Remove from heat and leave it to come down from pressure.
  5. Take out the bay leaf and puree the soup with a hand blender.
  6. Check the seasoning and serve immediately. It also freezes well, so I usually make up a big batch.


Saturday 17 October 2015

Spiced fruit buns


These are based on hot cross buns, which we love and haven't always been able to get hold of in our travels around the world. This version is more of a spicy teacake, delicious toasted and buttered and is one of our favourite breakfast foods. In Canada I couldn't get hold of mixed spice, but I could buy tea masala, an Indian spice mix used for making spiced chai tea. Slightly more peppery than the mixed spice I buy in England, it works really well. If you can't get mixed spice, use ground cinnamon, nutmeg and ginger. They freeze really well; put them in ziplok bags once they are cool and freeze the day you make them.
  • 540g plain flour
  • 50g granulated sugar
  • 2.5 tsp dried yeast
  • 1 tsp salt
  • 3 tsp mixed spice
  • 50g dried mixed peel
  • 150g dried fruit (mainly raisins and sultanas, but a few cranberries, cherries or apricots are a nice addition)
  • 1 egg, beaten
  • 200ml warm milk
  • warm water
  • 40g butter, melted
  1. Put all the dry ingredients in a mixer bowl.
  2. Add the milk to the beaten egg, stir in the melted butter, then top up to 400ml with warm water.
  3. Pour the liquid into the dry ingredients.
  4. Knead using a dough hook attachment (or by hand if you don't have a mixer). Add more flour if the mixture is too wet.
  5. Shape into buns using around 90g for each bun. This usually ends up with 13 buns, a baker's dozen.
  6. Place on a baking sheet, cover with a cloth and leave to rise in a warm place for about 1 hour or until roughly doubled in size.
  7. Optional - for hot cross buns, make a paste from 75g flour and about 5 tbsp water and pipe crosses onto each bun after proving.
  8. Bake in a preheated oven at 400 F/220 C for about 10 - 15 minutes until golden and cooked through.
  9. Optional - glaze the buns: immediately on removing from the oven, pour over a sugar syrup made from 2 tbsp water and 2 tbsp sugar, heated together until reduced and syrupy (but not caramelized).


Friday 16 October 2015

Bacon and Broccoli Cobbler aka pink bobbly pie

One of those recipes that feels like it's been around forever and remains a firm family favourite. The savoury scones top a creamy bacon and broccoli sauce, flavoured with mixed herbs and grainy mustard. Serve with some steamed carrots. Not so cheffy son tried making it once, but the topping turned into a pink bobbly mass according to his girlfriend. Hence the title.

(The scones can also be baked separately and served as an accompaniment to soups. You can vary the spices and seasonings you use in them. I normally add some paprika and maybe some dried oregano with salt and pepper. In today's version I used some sriracha chili sauce in place of some of the ketchup. Some caramelized onion, finely chopped walnuts and cumin seeds make another delicious version.)


Serves 4 - 5

For the savoury cobbler scones:
  • 12 oz self raising flour (or plain flour + 3 tsp baking powder)
  • 3 oz margarine or butter
  • 3 oz grated cheese
  • seasonings (salt and pepper, 1 tsp paprika)
  • 2tbsp tomato ketchup (or a mixture of sriracha and ketchup)
  • about 8 tbsp milk
For the bacon and broccoli sauce:

  • 400g chopped smoked bacon (I always use cooking bacon, which is ridiculously cheap and already chopped up for you)
  • 300 g- 400g broccoli, cut into small pieces, including the tender parts of the stems
  • 1 onion, chopped
  • 1 yellow or red pepper, chopped
  • 100 g mushrooms, cleaned and sliced
  • glug of olive oil
  • 2 tbsp cornflour
  • about 500ml milk (or a mixture of milk and stock)
  • 1 bayleaf
  • 1 tsp grainy mustard (I used honey mustard as there was a jar of it open)
This is mixed enough
  1. Make the scones: rub the margarine or butter into the flour until it looks like breadcrumbs (using a mixer if you have one). 
  2. Stir in the seasonings and the cheese.
  3. Add the ketchup (and sriracha if using) and around 6 tbsp of the milk and mix together until a dough just forms, adding more milk if necessary. Don't overwork the dough - there can still be some loose bits. If you overwork it you will get tough scones.
  4. Tip the dough onto a work surface and gently knead to combine into a smooth ball of dough.
  5. Roll the dough to a thickness of around 2 cm and cut out shapes of your choosing. Reroll the trimmings and cut more shapes until you have used up all the dough.

  1. Pre heat the oven to 200 C
  2. For the sauce, put the broccoli in a microwave proof dish with a tablespoon of water, cover and microwave for 2 or 3 minutes until partly cooked.
  3. Fry the onion and pepper in the olive oil until starting to soften, then throw in the bacon and continue to fry. Add the sliced mushrooms and soften slightly.
  4. Add the cornflour and stir around to cook the flour for a couple of minutes. 
  5. Gradually add the milk (and stock if using), stirring to combine until the liquid thickens into a creamy sauce. 
  6. Throw in the bayleaf and the broccoli along with its cooking liquid and stir together, adding the mustard and seasoning to taste.
  7. Continue to cook until the sauce is thick enough to support the weight of the scones without them sinking too far.
  8. Pour the mixture into a baking dish deep enough to hold it without it boiling over, then top with the scones. 
  9. Bake for around 30 minutes until the scones are risen, golden and cooked through and the sauce is bubbling.

Thursday 8 October 2015

Microwave Meatballs


Meatballs  in tomato sauce with courgettes

These are so easy and quick to make, I would never go back to frying meatballs. You can vary them by adding different herbs and spices, garlic, chili or other ingredients. We love an Italian style version, with oregano, basil, and garlic, served over spaghetti with tomato sauce. Another firm favourite is a Thai style version, with green Thai curry spices and a green curry sauce with coconut milk and coriander, served with rice, although we do argue about the level of chili heat.

A food processor makes the recipe very simple, as you can blitz the breadcrumbs with the garlic, fresh herbs and spices in seconds. If you don't have one, you'd have to chop the garlic and herbs and make the breadcrumbs by putting the bread in a plastic bag and bashing it with a rolling pin to break it up.

The uncooked meatballs freeze really well; to stop them sticking together, freeze on a tray, then put them into a zip lock freezer bag.

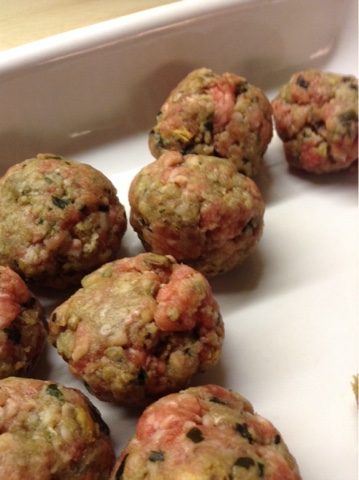
meatballs ready to zap in the microwave

Basic meatball recipe (makes about 25 meatballs, enough for 4 or 5 people)


500g minced (ground) meat (for the Italian version I tend to use a mix of beef and pork, for the Thai version, minced turkey is a good and healthy alternative)
about 100g stale bread (if it is very fresh, you might need to toast it lightly or dry it out in the oven to get it to crumb effectively)
1 egg, beaten
salt and pepper

Additions:
The delight of this recipe is that the variations are endless - try out different combinations to find your favourite.
- good handful of fresh herbs (for Italian style try sage, basil, oregano, thyme; for Thai style use basil and coriander - experiment with different combinations, you can't really go wrong)
- if you don't have fresh herbs, use a teaspoon or two of dried herbs, eg Italian seasoning, or a teaspoon of Thai green curry paste
1 clove garlic (optional)
1 small fresh chili (optional)
1/2 tsp smoked paprika
1/2 tsp paprika
cayenne pepper to taste


1. Blitz the bread in a food processor (with the fresh herbs and garlic if using)
2. Mix the breadcrumbs, meat, beaten egg and other flavourings in a big bowl so that they are thoroughly combined. Season well with salt and pepper.
3. Using your hands, shape the mixture into balls, using around 25g of mixture for each ball.
4. Arrange the meatballs in a single layer in a shallow microwaveable dish - a pyrex type pie dish is a good container to use.
5. Cook uncovered on full power in the microwave for 2 - 3 minutes, then rearrange the meatballs so that they can all cook evenly. Cook for another 2 - 3 minutes. They will be almost done by now. I normally finish them off by adding them and their cooking juices to whatever sauce I am using and simmering on the stove in a big frying pan or wok.

cooked meatballs emerge from the microwave

A note on sauces: you can make your own basic tomato sauce, like this one from my Veggie Daughter vegetarian cooking blog Veggie Daughter Tomato Sauce  or you could use a shop bought sauce. For the Thai style, the easiest way to make the sauce is to use your favourite Thai curry paste, mixed with coconut milk  and maybe some caramelized red onions and courgettes (I tend to use Mae Ploy brand Thai sauce and follow the instructions on the tub). A jar of Thai curry sauce would also work fine.